The process here in the Creditors application and in the Accounting application ( A.P. Create Cheques) creates the payment record associated with the creditors invoice(s) to show that it has been paid. How the payment record is output may well be a cheque - but it could equally be an EFT (Electronic Funds Transfer) payment/direct credit etc.
Creditor cheques can be created on an individual basis (i.e. creditor by creditor) from here within the Creditors application. Bulk selections and cheque creation can be made from the Accounting application (see Accounts User Manual).
NOTE: The purpose of this transaction type within Creditors is to issue one-off cheque payments i.e. those that are outside of, or not part of a standard cheque run as processed in the Accounting application.
Insert a Creditor's Cheque
- From the Home menu, select Financial > Creditors.
- Search for and retrieve a Creditor (see Retrieve an Existing Creditor).
-
Click
 Insert to add a new entry.

-
SelectCheque.
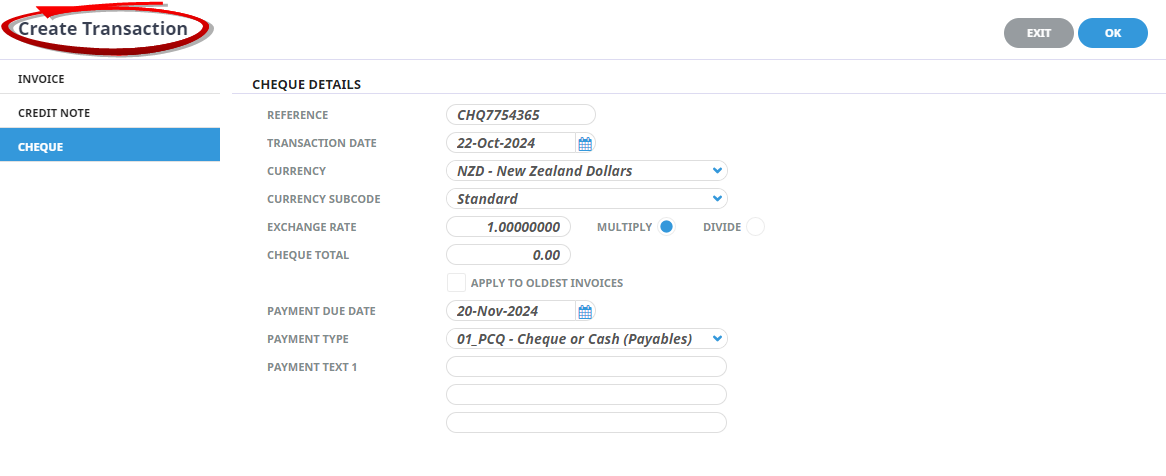
- Fill in the required fields and select OK to be taken to Select Invoice Lines (or select Exit to abandon the cheque creation and return to the Accounting Transaction screen).
-
On the Select Invoice Lines
.png)
-
Select OK to open theInsert Cheque Screen (or Exit to return to the Accounts Transaction screen).
- Select Save to create the cheque (or Exit to abandon the cheque return to the Transaction List screen).
- Select Insert to insert another cheque line.
NOTE: To delete, select an invoice line and click Delete from the Edit Cheque Screen.
About Create Transaction Fields
Reference
The cheque number being issued.
Transaction Date
Effectively the cheque date. This date determines the transaction period.
Currency
The currency the cheque is to be issued in. The supplier default currency is automatically applied to this field but an alternative currency may be selected from the drop-down.
Currency Subcode
If multiple exchange rates have been set up between currencies using Currency Subcodes, then select the Subcode from the dropdown. If currency subcodes are not being used, accept the default.
Exchange Rate
This field defaults to the exchange rate set in the Tourplan currency rate table which is valid for the transaction date. The exchange rate can be overridden here.
NOTE: The exchange rate of 1.00 will be used where the transaction currency and the system base currency are the same.
Cheque Total
The total amount of the cheque in transaction currency. This value is used as a control total and if the total value of invoices selected to be paid by this cheque does not equal the value in this field, a warning will display.
Apply to Oldest Invoices
When checked, one of two scenarios occurs.
- If the Cheque Total field has a value in it, the system will find the oldest invoice(s) and apply up to that value. It could be one invoice that has the full Cheque Total Amount applied to it or it could several invoices, some of which are paid in full, and one which has the Cheque Total residual balance applied to after the oldest invoices have been satisfied. The Insert Cheque Screen displays and the amounts applied can be edited.
- If the Cheque Total field is left empty, then all invoices will be selected for their full value. Again, the Insert Cheque screen will display and amounts can be edited.
Payment Due Date
This field is used to filter invoices available for payment for this supplier with a payment due date on or before the date entered in this field. The payment due date is set when the supplier invoice is being entered.
Payment Type
When cheques are entered into Tourplan NX, a payment type must be applied to the transaction. The payment type is used to direct the credit side of the transaction (which is normally the Bank Account) to the account attached to the payment type. This means that e.g., payments to off-shore suppliers can be made from foreign currency bank account and payments for on-shore suppliers made on a local bank account.
Choose the payment type and associated bank account from which this payment will be made. Payment types are set up in Code Setup (System Setup User Manual, Payment Types ).
Payment Text
NOTE: If Payment Type text field headings have been set up in the payment type, these will display next to the text fields.
If specific payment type text is not required, these fields can be used for optional text description of this cheque. This information may then be selectively and optionally output on supplier messages—e.g. the remittance advice. Whether the text is output depends entirely on the set up of the supplier message formats.
About Select Invoice Lines Fields
Row Selection
To include a specific invoice(s) from the list in the cheque, highlight the required row which will select the check-box at the beginning of that row. Alternatively select the required check-box(es) directly.
NOTE: Checking/Unchecking the check-box in the column header will select/unselect all invoices within the list.
NOTE: The column headings displayed are the default columns available in this screen. To change the columns displayed, refer to the Change Default Column Headings.
Date (Display Only)
The date of the invoice(s).
Due Date (Display Only)
The payment due date applied when the invoice transaction was entered into the system.
Item (Display Only)
The transaction item. For bookings transactions, this will always be the Booking Reference. For non-booking transactions, it will be the invoice number that the cheque is paying.
Reference (Display Only)
The invoice transaction reference of the supplier invoice(s) available to be paid.
Line (Display Only)
The invoice transaction line number.
Outstanding (Display Only)
The outstanding amount of each of the invoices listed.
Select All / Unselect All Buttons
Use these buttons to either select or unselect all found invoice lines.
Line Details Section (Display Only)
NOTE: These fields are empty until at least one invoice has been selected. The fields display details of the currently highlighted invoice line.
Selected for Payment
When checked, it indicates that the currently highlighted line has been selected for inclusion in the cheque.
Invoice Reference (Display Only)
The invoice number of the currently highlighted invoice line.
Invoice Amount (Display Only)
The invoice amount of the currently highlighted invoice line.
Credit Amount (Display Only)
The sum of any credit note(s) already applied to the currently highlighted invoice.
Withheld Amount (Display Only)
Any amount that is currently being withheld from the currently highlighted invoice line.
Already Paid (Display Only)
The sum of any payment amount(s) already applied to the currently highlighted invoice.
Outstanding (Display Only)
The sum of Invoice Amount less Credit(s), Withheld and Already Paid amounts.
This Cheque
The residual balance of the invoice, which is also the amount the system is expecting to pay. This value can be edited.
Summary Section
NOTE: These fields are the cumulative value of the currently selected invoice line(s).
Cheque Header Amount (Display Only)
This field displays the sum of the Cheque Total field in the cheque header screen. If the cheque header Cheque Total field has been left at 0.00, this field will display 0.00. This is primarily a Control Total field which during the course of the cheque creation, will display any discrepancy between the expected cheque amount and the actual cheque amount.
Selected (Display Only)
The quantity and value of invoice lines currently selected.
Remainder (Display Only)
The sum of the Cheque Header amount less the Selected Amount. See Cheque Total above.
Found (Display Only)
The quantity and value of all invoice lines found, whether or not they have been selected.
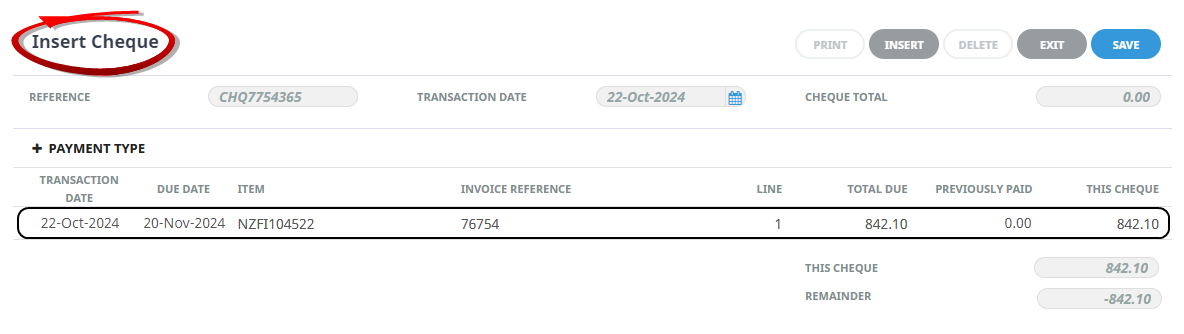
About Insert Cheque Fields
The following fields are defaulted from the previous entries.
Reference (Display Only)
The cheque transaction reference as entered in the previous Transaction Header screen.
Transaction Date (Display Only)
The transaction date as entered in the previous Transaction Header screen.
Cheque Total (Display Only)
The cheque total as entered in the Transaction Header screen. If the field was left blank on the Transaction Header screen, then it will show 0.00 here. This field will fill after the cheque has been saved and the Cheque Header amount has been updated.
Payment Type
The Payment Type and Descriptions entered in the Create Transaction screen allow users to add and edit details for new and existing cheque transactions. The descriptions can be expanded to view or collapsed to hide.
About Cheque Line Headings
Transaction Date (Display Only)
This is the Transaction Date of the invoice(s) the cheque is paying.
Due Date (Display Only)
The Payment Due Date of the invoice(s) the cheque is paying.
Item (Display Only)
The transaction item. For bookings transactions, this will always be the Booking Reference. For non-booking transactions, it will be the invoice number that the cheque is paying.
Invoice Reference (Display Only)
The reference number of the invoice(s) the cheque is paying.
Line (Display Only)
The Line Number of the creditors invoice.
NOTE: If there is one voucher per creditors invoice, this will always display '1'. If there are multiple vouchers per creditors invoice, then this value will be the line number from the invoice.
Total Due (Display Only)
The original amount of the voucher line.
Previously Paid (Display Only)
The total of any previously paid amounts.
This Cheque (Display Only)
The sum of the This Cheque line values.
Remainder (Display Only)
The sum of the Cheque Total at the top of the screen less This Cheque amount.
NOTE: This field will display any discrepancy between the Transaction Header cheque amount and the actual cheque amount. See Cheque Total above.
Edit Cheque Line
If the cheque amount needs to be edited, click on the required Transaction line to open the Edit Cheque Line dialogue.
![]()
Reference (Display Only)
The suppliers invoice number the cheque line relates to.
Transaction Date (Display Only)
The Suppliers invoice date this cheque line relates to.
Payment Due Date (Display Only)
The payment due date calculated/entered when the invoice transaction was entered into the system.
Invoice Amount (Display Only)
The original amount of the invoice this cheque line relates to.
Credit Amount (Display Only)
Total value of credit notes applied to the invoice this cheque line relates to.
Withheld Amount (Display Only)
Any amount that has been withheld from the invoice this cheque line relates to.
Already Paid (Display Only)
Displays any amount already paid to the supplier for this invoice line.
Outstanding (Display Only)
The result of Invoice Amount less Credit Amount, less Withheld Amount, less Already Paid.
This Cheque
The payment amount for this invoice line can be edited here.
A Mismatch
If during the saving of the cheque, the sum of the cheque lines does not equal the amount entered into the Cheque Header field Cheque Total , a warning message appears .
![]()
- The cheque can still be saved by clicking yes.
- Clicking No will allow the cheque lines to be edited until the Remainder field on the Insert Cheque screen is 0.00.
- If the Cheque Header field Cheque Total was left blank/0.00, clicking save will update the header Cheque Total to equal the Cheque Amount.
Printing Cheques
Printing the Cheque
- After the cheque has saved, the option exists to output it using Print.
- Clicking Print on either the Insert Cheque or Edit Cheque screen displays the Output Documents dialogue.
- Select a Document Format. The document type chosen (Cheque Message, Remittance/Cheque Message or Remittance Message) will determine which fields display in the dialogue.
-
ClickOK to send the cheque to the printer.

-
When the document format is selected that is aRemittance Advice only - i.e., there is no Cheque section in the template.
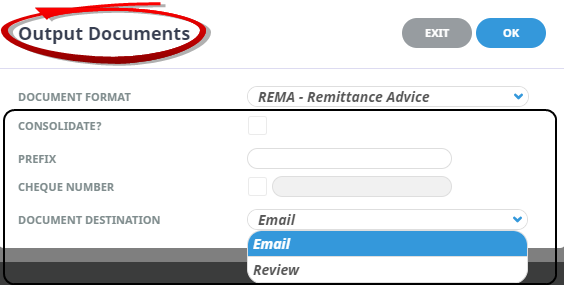
NOTE: The fields in this dialogue are the same as for the cheque print output, except instead of selecting a printer, the Document Destination field allows Email or Printer output.
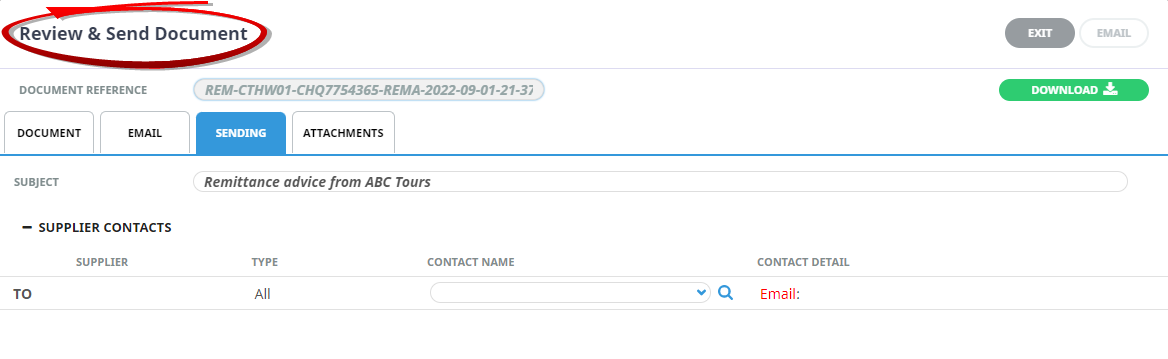
-
If Email is selected, after OK has been clicked, the standard Review & Send Document screen opens which allows the review and sending of the document via email, and also offers adownload option to allow the document to be downloaded.
![]()
![]()
![]()
NOTE: The Printer drop-down is the only mandatory field in the dialogue.
About Output Document Fields
Consolidate
Where there are multiple vouchers being paid on one cheque, checking this box will output one line (the transaction total) on the remittance advice rather than lines for the individual payments.
Prefix
The system will print the reference as entered in the transaction header. If the cheque needs to be re-printed - e.g., printer malfunction or lost cheque being replaced - then a reference prefix can be entered in this field.
Cheque Number
If the cheque needs to be re-printed - e.g., printer malfunction or lost cheque being replaced - then the new cheque reference can be entered in this field.
NOTE: If a new Prefix/Cheque Number is entered, the Cheque Reference entered in the Transaction Header screen will be overridden with the new prefix/reference.
Printer
Select the required printer from the drop-down list.